
Production and Common Problems Of Positive And Negative Molds in Vacuum Infusion and LRTM Process

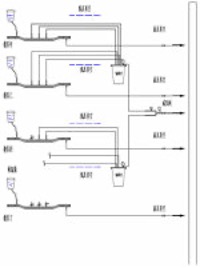
Pipeline Diagram Picture
Introduction:
- High-pressure vacuum sucks the edge of the mold;
- Low-pressure vacuum flows from the mold to the vacuum cylinder;
- Use pliers to lock the outlet when the mold is discharging glue;
- Rinse the vacuum tube with acetone and seal the inlet;
- Finally, clamp all the outlets. Continue to maintain high-pressure mold locking;
- Demold after the product is cured.
Production of Positive Mold
The positive mold is the basis for making molds. Only the positive mold directly affects the structural form of the mold, and its surface quality does not play a role in the reverse mold. However, its surface gel coat quality requirements are very high, because in a closed space, the heat released by the curing of fiberglass reinforced plastics is very high, which accumulates inside the mold and burns the surface of the mold. In addition to selecting good gel coat materials, the following points should be noted.
Determination of Parting Surface
Of course, the largest part should be selected for the parting surface of a product. However, if the product is as shown in the figure below, which parting surface should be selected in the middle? The bottom part should be selected because the same product can be produced. Selecting the bottom parting surface can provide a good layering and provide a reference edge when layering. Otherwise, the cutting line will be covered by the gel coat and there will be no basis for layering.

Avoid Pinholes
First, choose high-quality mold gel coat. Suitable mold gel coat. The leveling, defoaming, viscosity and thixotropic curing characteristics of the gel coat are stable. In addition to the excellent base resin, a good gel coat also has a certain defoamer and leveling aid. Selecting an excellent mold gel coat with good additives can effectively reduce the number of pinholes.
One of the reasons why the curing system of the gel coat is prone to pinholes is to prevent the curing time from being too short, and the curing agent should be added in an appropriate proportion.
In order to be more in line with the proportion, it is recommended to use a pre-accelerated type. In addition, a good curing agent has less hydrogen peroxide and less water molecules decomposed when initiating the polymerization reaction, thereby improving the curing degree of the gel coat and reducing the pinhole phenomenon.
The gel coat has uniform thickness. Try to make the thickness uniform, so spraying is more conducive to the removal of bubbles than hand brushing, and it is also one of the methods to reduce vacuum and bubbles.
The low cleanliness of the compressed air used for spraying is also one of the reasons for the vacuum. Use clean air to avoid pinholes caused by oil droplets and water vapor.
Spraying method. It is conducive to the removal of bubbles. The first layer of the first spray is thin, and then covered after an interval of 1-2 minutes. The previous spraying method is easy to remove bubbles. In addition, try to reduce or do not use styrene and acetone dilution. The best method is to increase the ambient temperature and gel coat temperature. The room temperature of 18-30 degrees and the humidity of 35%-50% are the best conditions for gel coat spraying.
Good wood mold surface. Loose and rough surface is not conducive to gel coat construction, nor is it conducive to the discharge of bubbles. Therefore, try to increase the density and hardness of the surface to make the surface smooth.
After the wood mold is completed, try to inspect it immediately and proceed to the next construction, or cover it with a shield. If air dust or spraying falls on the mold surface, it will cause certain quality risks.
Understand the related dimensions of the mold.
Everyone will pay attention to this problem. Just like the tolerance matching in the machinery industry, the requirements of related dimensions are mutually influential with other products and are separate dimensions. The positioning piece should be placed on the wood mold or transition mold, in the middle of the rubber strip, about 90 mm outward from the cutting edge of the product.
Considering the shrinkage deformation of FRP molds, in terms of outline size, the size deformation of FRP is about one thousandth to one and a half, while the outline size will be smaller. Considering the overall deformation of FRP, the steel skeleton is strengthened to constrain this overall deformation, so that the large impact of hoisting and transportation will not cause deformation.
Mold Laying
The front mold is generally laid with gel coat plus 30g/㎡ surface felt, then a layer of 300 g/㎡ chopped felt, then a layer of 300g/㎡ chopped felt, and then a composite layer of chopped felt and cloth. The initial layer should remove bubbles, so there are many, and the excess resin should be pressed out with a wool roller, and the bristle roller is used to drive out bubbles to facilitate surface toughness.
Flange Treatment
The flange treatment is best to be thicker than the inside, generally adding several layers of felt, considering the influence of deformation, some fillers should be added. It is best to apply a layer of topcoat as the last layer to protect the mold, and then weld the steel frame. The principle of the steel frame is that the steel pipe around the large mold is close to the inside, and the small mold is close to the outside, and the position is between the rubber strips.
The arc surface of the steel ring can be processed by outsourcing, and the approximate curvature can be calculated in advance. It is fixed to the lower surface of the mold with two layers of chopped felt. The height should be convenient for employees to operate, and the flange should be 700 mm from the ground.

For arc-surface molds, it is best to weld the steel frame into an arc shape, directly surround the outside of the mold, and then form it to reduce welds and workload.
Mold Processing
The best way to process the mold is to put it in an oven and bake it at 35-40 degrees for 30 minutes. First, apply the sealant 1~2 times, then apply the imported release agent 770 or 2134 four times, with an interval of 15 minutes. The last time should be wiped clean, and then apply wax several times, no less than 3 times. Then you can start production.
Production of Reverse Mold
The production of reverse mold in closed mold process is a key issue. If it is a positive rigid mold, the reverse mold can be said to be a semi-elastic rigid mold. The key to production is to select suitable gel coat and resin. It is required to be relatively transparent after curing. The thickness should not be too large, because too high strength will reduce plasticity and lose the advantage of vacuum adsorption, while too thin will lose rigidity and the stress-bearing parts will crack easily after a long time.
Therefore, high temperature resistant vinyl resin is used as the surface layer as much as possible, and the steel frame only plays the role of preventing the deformation of the circumference and facilitating transportation. The general laying method is vinyl gel coat plus several layers of chopped felt, about 5 mm. The resin should be selected with good transparency, such as mold No. 1 or 196, etc., and 105# should never be used.
The general process is to lay the same wooden board as the product on the positive mold first, and keep it consistent with the cutting edge reserved by the outer mold. The flat surface can be laid with density board, and the curved surface can be laid with cut square wooden boards. Be careful not to have large spans.
After all the laying is completed, use putty to scrape the whole into the shape of the inner surface of the product, and then stick the rubber strip about 30 mm outward from the outermost edge of the product. The width of the inner ring rubber strip is to be determined as 20mm, and the outer ring rubber strip is determined to be 20mm. After the bonding is firm, the normal release agent treatment is carried out.
The exhaust nozzle and injection nozzle during laying are required to be arranged reasonably. The flat part is about one to two per square meter. There must be exhaust nozzles and injection nozzles at the farthest point of the resin flow and the highest point of the peripheral runner.
The appropriate increase in injection nozzles and exhaust holes is to increase the molding speed. The design of the runner is to use a semicircular rubber strip to make a closed ring at the edge of the flange, so that even if some fibers are displaced due to scouring, the whole will not be blocked.
Illustrations of Common Problems in Mold Making
The treatment of corners is often on the facade.
The negative mold radius of the positioning part should be larger and lower in height to facilitate mold closing. Even if the positive mold positioning part is partially dirty and has fibers, it does not affect mold closing. The radius of this part can be slightly larger, and can be greater than R50, because the rubber strip is easy to peel off and difficult to turn.
As shown in the figure

Cracking of the reverse-mold gelcoat caused by excessive resin content

The high-pressure vacuum suction pipe is installed too low, which will cause difficulty in use, as shown in the figure:

Improper positioning of the parts causes the inner rubber strip to be close to the product runner, which may easily cause internal air leakage. As shown in the figure:

The flange surface of complex products should be kept level with the ground as much as possible to facilitate compaction during mold closing. As shown in the figure below, the felt is not laid well here, and it is also the bolt connection part of the air deflector, which is easy to crack, so the cutting edge should be extended from 15 mm to 25 mm to facilitate laying. (The front and rear top molds of the bottom bin should consider the reserved amount of the cutting edge).

IF COMPOSITE MATERIAL IS NEEDED, PLEASE GET A HOLD OF US IN WHICHEVER WAY IS MOST CONVENIENT. WE WILL REPLY YOU WITHIN 24 HOURS.
